A Comprehensive Guide to Setting Up a WordPress Instance Using AWS Lightsail
WordPress is a powerful and widely used content management system (CMS) that allows you to create and manage websites with ease. If you’re looking for a reliable and scalable hosting solution for your WordPress website, AWS Lightsail is an excellent choice. In this comprehensive guide, we will walk you through the step-by-step process of setting up a WordPress instance on AWS Lightsail, ensuring a seamless and efficient deployment.
Step 1: Sign up for AWS Lightsail
- Go to the AWS Lightsail website (https://lightsail.aws.amazon.com/).
- Sign in using your existing AWS account or create a new one if you don’t have one already.
- Once logged in, click on “Create an instance” to start the setup process.
Step 2: Configure your instance
- Choose a location: Select the region where you want to host your WordPress instance.
- Choose a blueprint: Select “WordPress” from the list of available blueprints.
- Choose a plan: Pick a plan based on your website’s expected traffic and resource requirements.
- Give your instance a name: Provide a unique and meaningful name for your WordPress instance.
- Click on “Create instance” to proceed.
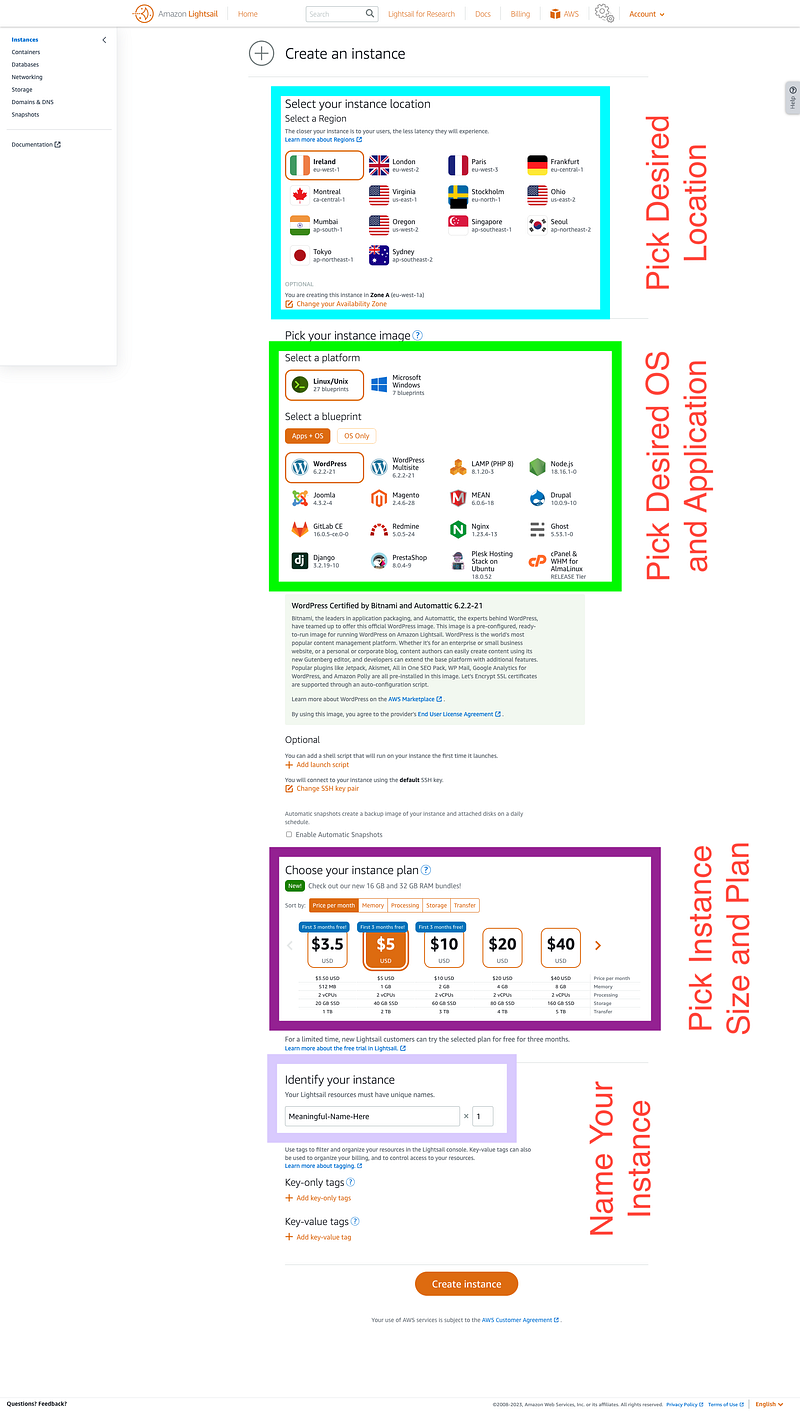
Step 3: Configure your instance settings
- Wait for the instance to be created. Once it’s ready, click on its name to access the management console.
- In the instance management console, navigate to the “Networking” tab.
- Configure the firewall: Ensure that ports 80 (HTTP) and 443 (HTTPS) are open for incoming traffic.
- Allocate a static IP: Under the “Networking” tab, click on “Create static IP” and assign it to your instance for a fixed IP address.
Step 4: Connect to your instance
There are 2 ways to connect to your instance here.
- The direct console access that AWS provides on browsers (Recommended For Lighsail Instances)
- Open a command prompt on your local machine and use the following SSH command to SSH and connect to your instance.
ssh -i <path_to_private_key> bitnami@<instance_public_ip>
Note: Replace<path_to_private_key> with the path to your private key file and <instance_public_ip> with the public IP address of your instance.
3. Navigate to the “Network” tab and Configure the firewall: Ensure that ports 80 (HTTP) and 443 (HTTPS) are open for incoming traffic.
4. Allocate a static IP: Under the “Networking” tab, click on “Create static IP” and assign it to your instance for a fixed IP address.
Step 5: Get your WordPress admin password
Very Easy!
Connect to your instance and type the following:
cat bitnami_credentials
You will see something like this:
******************************************************************************The default username and password is '<username>' and '<password>'.******************************************************************************You can also use this password to access the databases and any other component the stack includes.Please refer to https://docs.bitnami.com/ for more details.
Step 6: Configure SSL Certificate
- Connect to your WordPress instance via SSH.
- Run the command:
sudo /opt/bitnami/bncert-toolto launch the bncert tool. - Choose the domains you want to include in the SSL certificate.
- Configure redirection from HTTP to HTTPS if desired.
- Configure certificate settings, such as generating a new Let’s Encrypt certificate or using an existing one.
- Confirm the changes by reviewing the summary and entering “Y” to proceed.
- Wait for the configuration process to complete.
- Test the SSL certificate by accessing your website with the domain name using HTTPS.
By following these steps, you can easily set up and configure an SSL certificate for your WordPress instance, ensuring secure communication and building trust with your website visitors.
You can read through this documentation for more detailed steps: https://lightsail.aws.amazon.com/ls/docs/en_us/articles/amazon-lightsail-enabling-https-on-wordpress
In a nutshell, Setting up a WordPress instance on AWS Lightsail provides a scalable and reliable hosting solution for your website. By following this comprehensive guide, you can deploy a WordPress instance with ease and enjoy the benefits of AWS infrastructure. Whether you’re a beginner or an experienced developer, this step-by-step process will help you get your WordPress website up and running quickly. Leverage the power of AWS Lightsail and WordPress to create a professional and responsive website tailored to your needs.